

This translation is community contributed and may not be up to date. We only maintain the English version of the documentation. Read this manual in English
コンピュートプログラム
Defold のコンピュートシェーダー(compute shader)サポートは、現在 テクニカルプレビュー の段階です。 そのため、一部の機能が不足しており、API が今後変更される可能性があります。
コンピュートシェーダーは、GPU 上で汎用計算を実行するための強力なツールです。GPU の並列処理能力を、物理シミュレーションや画像処理などのタスクに活用できます。コンピュートシェーダーはバッファーやテクスチャに格納されたデータを扱い、多数の GPU スレッドで並列に演算を実行します。この並列性により、コンピュートシェーダーは負荷の高い計算で大きな力を発揮します。
- レンダリングパイプラインの詳細については、レンダリングのドキュメントを参照してください。
- シェーダープログラム(shader program)の詳しい説明については、シェーダーのドキュメントを参照してください。
コンピュートシェーダーでできること
コンピュートシェーダーは汎用計算を目的としているため、できることには実質的に制限がありません。コンピュートシェーダーの代表的な用途をいくつか紹介します。
画像処理
- 画像フィルタリング: ぼかし、エッジ検出、シャープ化フィルターなどを適用します。
- カラーグレーディング: 画像の色空間を調整します。
物理シミュレーション
- パーティクルシステム: 煙、炎、流体力学などのエフェクトのために、多数のパーティクルをシミュレートします。
- ソフトボディ物理: 布やゼリーのような変形する物体をシミュレートします。
- カリング: オクルージョンカリング、視錐台カリング
プロシージャル生成
- 地形生成: ノイズ関数を使って詳細な地形を作成します。
- 植生と草木: 植物や木をプロシージャルに生成します。
レンダリングエフェクト
- グローバルイルミネーション: シーン内で光が反射する様子を近似し、リアルなライティングをシミュレートします。
- ボクセル化: メッシュデータから3D ボクセルグリッドを作成します。
コンピュートシェーダーの仕組み
大まかに言うと、コンピュートシェーダーはタスクを、同時に実行できる多数の小さなタスクに分割して処理します。これは、ワークグループ(work groups)とインボケーション(invocations)という概念によって実現されます。
- ワークグループ
- コンピュートシェーダーは、格子状に並んだ
work groups上で動作します。各ワークグループには、固定数のインボケーション(スレッド)が含まれます。ワークグループのサイズとインボケーションの数は、シェーダーコードで定義します。 - インボケーション
- 各インボケーション(スレッド)は、コンピュートシェーダープログラムを実行します。同じワークグループ内のインボケーションは共有メモリを通じてデータを共有できるため、効率よく通信や同期を行えます。
GPU は複数のワークグループにわたって多数のインボケーションを並列に起動し、コンピュートシェーダーを実行します。これに適したタスクでは、大きな計算能力を発揮します。
コンピュートプログラムの作成
コンピュートプログラム(compute program)を作成するには、Assets ブラウザーで作成先のフォルダーを 右クリック し、New... ▸ Compute を選択します。(メニューから File ▸ New... を選択してから、Compute を選択することもできます。)新しいコンピュートファイルに名前を付け、Ok を押します。
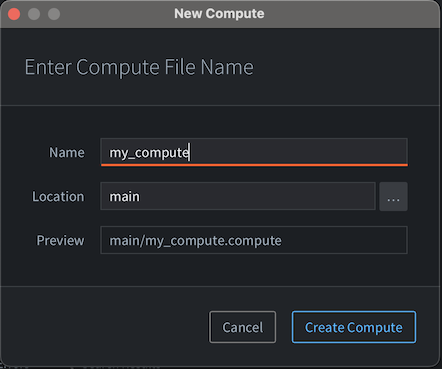
新しいコンピュートファイルが Compute Editor で開きます。
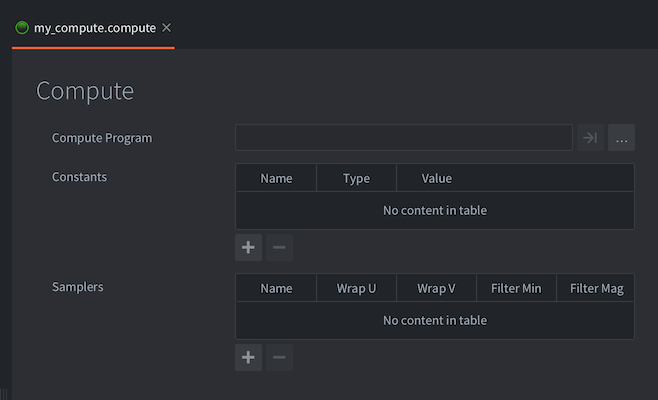
コンピュートファイルには、次の情報が含まれます。
- Compute Program
- 使用するコンピュートシェーダープログラムファイル(
.cp)です。シェーダーは「抽象的な作業項目」を処理するため、入力と出力のデータ型には固定された定義がありません。コンピュートシェーダーが何を生成するかは、プログラマーが定義します。 - Constants
- コンピュートシェーダープログラムに渡すユニフォーム(uniform)です。使用できる定数の一覧については、後述の説明を参照してください。
- Samplers
- 必要に応じて、マテリアル(material)ファイルで特定のサンプラー(sampler)を設定できます。サンプラーを追加し、シェーダープログラムで使用する名前を付け、ラップとフィルターの設定を好みに合わせて指定します。
Defold でのコンピュートプログラムの使用
マテリアルとは異なり、コンピュートプログラムはどのコンポーネント(component)にも割り当てられず、通常のレンダリング処理にも含まれません。コンピュートプログラムに処理を実行させるには、レンダースクリプト(render script)でディスパッチ(dispatched)する必要があります。ただし、ディスパッチする前に、レンダースクリプトがそのコンピュートプログラムへの参照を持っていることを確認する必要があります。現在、レンダースクリプトがコンピュートプログラムを認識する唯一の方法は、レンダースクリプトへの参照を保持する .render ファイルに追加することです。
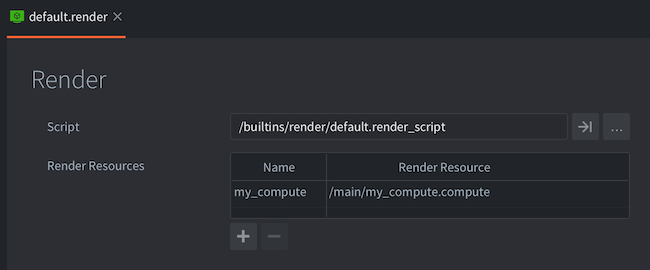
コンピュートプログラムを使用するには、最初にレンダリングコンテキストにバインドする必要があります。これはマテリアルと同じ方法で行います。
render.set_compute("my_compute")
-- Do compute work here, call render.set_compute() to unbind
render.set_compute()
コンピュート定数はプログラムのディスパッチ時に自動的に適用されますが、入力や出力のリソース(テクスチャやバッファーなど)をエディターからコンピュートプログラムにバインドする方法はありません。これらはレンダースクリプトでバインドする必要があります。
render.enable_texture("blur_render_target", "tex_blur")
render.enable_texture(self.storage_texture, "tex_storage")
決めた作業空間でプログラムを実行するには、プログラムをディスパッチする必要があります。
render.dispatch_compute(128, 128, 1)
-- dispatch_compute also accepts an options table as the last argument
-- you can use this argument table to pass in render constants to the dispatch call
local constants = render.constant_buffer()
constants.tint = vmath.vector4(1, 1, 1, 1)
render.dispatch_compute(32, 32, 32, {constants = constants})
コンピュートプログラムからのデータの書き込み
現在、コンピュートプログラムから出力を生成するには、どの種類の出力でもストレージテクスチャ(storage textures)を使う必要があります。ストレージテクスチャは「通常のテクスチャ」に似ていますが、より多くの機能と設定に対応しています。名前のとおり、ストレージテクスチャはコンピュートプログラムからデータを読み書きできる汎用バッファーとして使用できます。その後、同じバッファーを別のシェーダープログラムにバインドして読み取れます。
Defold でストレージテクスチャを作成するには、通常の .script ファイルで処理する必要があります。レンダースクリプトにはこの機能がありません。動的テクスチャの作成には resource API が必要で、この API は通常の .script ファイルでしか使用できないためです。
-- In a .script file:
function init(self)
    -- Create a texture resource like usual, but add the "storage" flag
    -- so it can be used as the backing storage for compute programs
    local t_backing = resource.create_texture("/my_backing_texture.texturec", {
        type   = graphics.TEXTURE_TYPE_IMAGE_2D,
        width  = 128,
        height = 128,
        format = graphics.TEXTURE_FORMAT_RGBA32F,
        flags  = graphics.TEXTURE_USAGE_FLAG_STORAGE + graphics.TEXTURE_USAGE_FLAG_SAMPLE,
    })

    -- get the texture handle from the resource
    local t_backing_handle = resource.get_texture_info(t_backing).handle

    -- notify the renderer of the backing texture, so it can be bound with render.enable_texture
    msg.post("@render:", "set_backing_texture", { handle = t_backing_handle })
end
全体を組み合わせた例
シェーダープログラム
// compute.cp
#version 450

layout (local_size_x = 1, local_size_y = 1, local_size_z = 1) in;

// specify the input resources
uniform vec4 color;
uniform sampler2D texture_in;

// specify the output image
layout(rgba32f) uniform image2D texture_out;

void main()
{
    // This isn't a particularly interesting shader, but it demonstrates
    // how to read from a texture and constant buffer and write to a storage texture

    ivec2 tex_coord   = ivec2(gl_GlobalInvocationID.xy);
    vec4 output_value = vec4(0.0, 0.0, 0.0, 1.0);
    vec2 tex_coord_uv = vec2(float(tex_coord.x)/(gl_NumWorkGroups.x), float(tex_coord.y)/(gl_NumWorkGroups.y));
    vec4 input_value = texture(texture_in, tex_coord_uv);
    output_value.rgb = input_value.rgb * color.rgb;

    // Write the output value to the storage texture
    imageStore(texture_out, tex_coord, output_value);
}
スクリプトコンポーネント
-- In a .script file

-- Here we specify the input texture that we later will bind to the
-- compute program. We can assign this texture to a model component,
-- or enable it to the render context in the render script.
go.property("texture_in", resource.texture())

function init(self)
    -- Create a texture resource like usual, but add the "storage" flag
    -- so it can be used as the backing storage for compute programs
    local t_backing = resource.create_texture("/my_backing_texture.texturec", {
        type   = graphics.TEXTURE_TYPE_IMAGE_2D,
        width  = 128,
        height = 128,
        format = graphics.TEXTURE_FORMAT_RGBA32F,
        flags  = graphics.TEXTURE_USAGE_FLAG_STORAGE + graphics.TEXTURE_USAGE_FLAG_SAMPLE,
    })

    local textures = {
        texture_in = resource.get_texture_info(self.texture_in).handle,
        texture_out = resource.get_texture_info(t_backing).handle
    }

    -- notify the renderer of the input and output textures
    msg.post("@render:", "set_backing_texture", textures)
end
レンダースクリプト
-- respond to the message "set_backing_texture"
-- to set the backing texture for the compute program
function on_message(self, message_id, message)
    if message_id == hash("set_backing_texture") then
        self.texture_in = message.texture_in
        self.texture_out = message.texture_out
    end
end

function update(self)
    render.set_compute("compute")
    -- We can bind textures to specific named constants
    render.enable_texture(self.texture_in, "texture_in")
    render.enable_texture(self.texture_out, "texture_out")
    render.set_constant("color", vmath.vector4(0.5, 0.5, 0.5, 1.0))
    -- Dispatch the compute program as many times as we have pixels.
    -- This constitutes our "working group". The shader will be invoked
    -- 128 x 128 x 1 times, or once per pixel.
    render.dispatch_compute(128, 128, 1)
    -- when we are done with the compute program, we need to unbind it
    render.set_compute()
end
互換性
Defold は現在、次のグラフィックスアダプターでコンピュートシェーダーをサポートしています。
- Vulkan
- Metal(MoltenVK 経由)
- OpenGL 4.3+
- OpenGL ES 3.1+
使用中のグラフィックスアダプターがコンピュートシェーダーをサポートしているかどうかは、graphics.get_adapter_info() で確認します。features フィールドには、そのアダプターがサポートするコンテキスト機能の定数の配列が含まれます。
local function has_context_feature(feature)
    local adapter_info = graphics.get_adapter_info()
    for _, supported_feature in ipairs(adapter_info.features) do
        if supported_feature == feature then
            return true
        end
    end
    return false
end

local compute_shaders_supported = has_context_feature(
    graphics.CONTEXT_FEATURE_COMPUTE_SHADER
)
配列にはサポートされている機能だけが含まれます。機能の定数をキーとするテーブルではありません。異なるグラフィックスアダプターや、ドライバーのサポート状況が異なるデバイスでゲームを実行できる場合は、コンピュートシェーダーを使用する前に必ずこの確認を行ってください。OpenGL と OpenGL ES のサポートは、API のバージョンとドライバーに依存します。Vulkan と MoltenVK 経由の Metal は、バージョン1.0からコンピュートシェーダーをサポートしています。Vulkan が既定のグラフィックスバックエンドではないプラットフォームでは、アプリケーションマニフェストを使って Vulkan を選択します。