This translation is community contributed and may not be up to date. We only maintain the English version of the documentation. Read this tutorial in English
Magic Link 튜토리얼
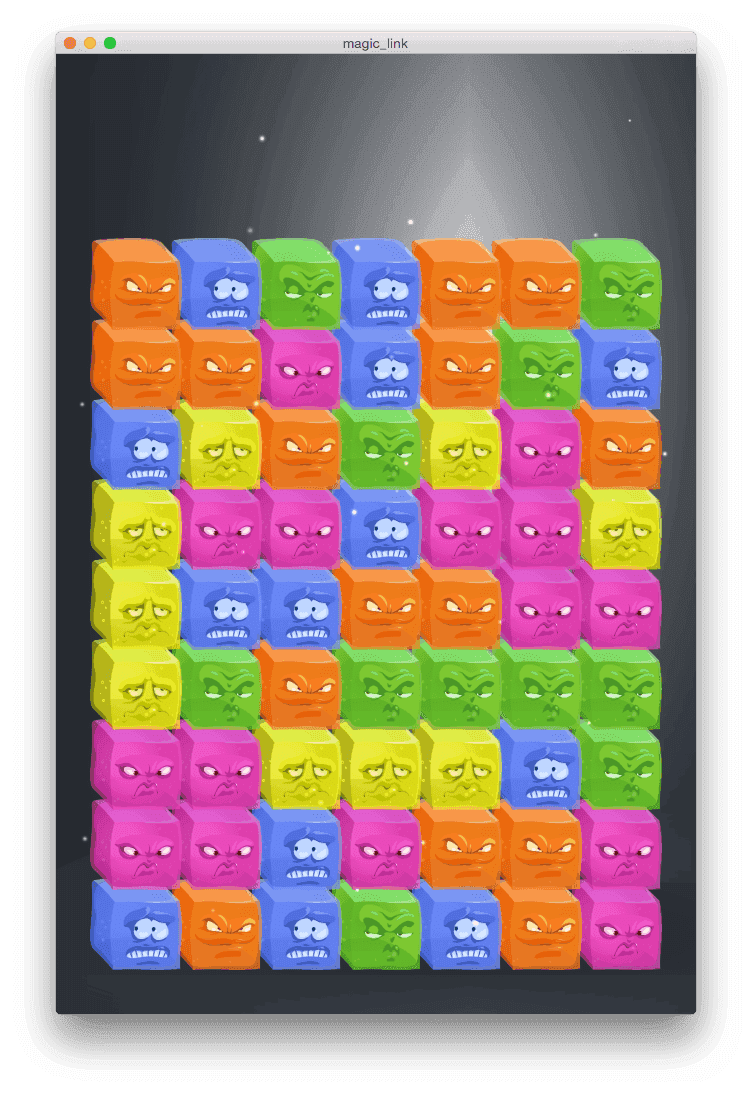
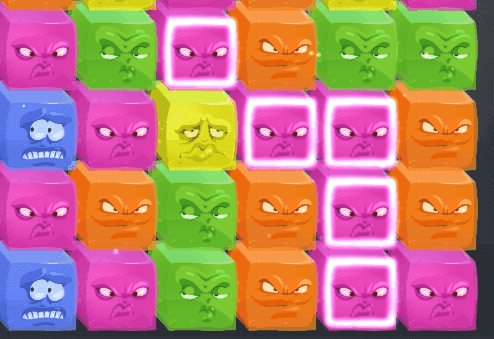
이 게임은 Bejeweled 와 Candy Crush 계열의 고전적인 매칭 게임을 변형한 것입니다. 플레이어는 같은 색 블록을 드래그해서 연결한 뒤 제거합니다. 하지만 이 게임의 목표는 같은 색 블록을 길게 연결해서 지우거나, 보드를 비우거나, 점수를 모으는 것이 아닙니다. 보드 곳곳에 흩어진 특별한 “매직 블록”들이 서로 연결되도록 만드는 것이 목표입니다.
이 튜토리얼은 완성된 디자인을 바탕으로 게임을 만드는 단계별 가이드입니다. 실제로는 제대로 작동하는 디자인을 찾는 데 많은 시간과 노력이 필요합니다. 핵심 아이디어에서 시작한 뒤, 그 아이디어가 어떤 가능성을 가지는지 더 잘 이해하기 위해 프로토타입을 만드는 방법을 찾게 될 수 있습니다. “Magic Link”처럼 단순한 게임도 꽤 많은 디자인 작업이 필요합니다. 이 게임도 최종 형태와 게임 규칙에 도달하기까지 몇 번의 반복과 실험을 거쳤으며, 그 최종 형태조차 완벽하다고 하기는 어렵습니다. 하지만 이 튜토리얼에서는 그 과정을 건너뛰고 최종 디자인을 바탕으로 바로 구현을 시작합니다.
시작하기
먼저 새 프로젝트를 만들고 에셋 패키지를 임포트해야 합니다.
- “Empty Project” 템플릿으로 새 프로젝트를 만듭니다.
- 참고용으로 완성된 “Magic Link” 프로젝트 magic-link.zip을 다운로드합니다. 프로젝트를 처음부터 만들고 싶을 경우를 위해 완성된 프로젝트에는 모든 에셋이 들어 있습니다.
게임 규칙

보드는 매 라운드마다 색이 있는 블록과 여러 매직 블록으로 무작위로 채워집니다. 색 블록은 다음 규칙을 따릅니다.
- 플레이어가 같은 색 블록끼리 드래그해서 연결하면 사라집니다.
- 블록이 사라지면 아래쪽에 빈 공간이 생깁니다. 색 블록은 아래에 열린 빈 공간으로 단순히 수직으로 떨어집니다.
- 화면 아래쪽은 모든 블록이 더 이상 떨어지지 않도록 막습니다.
매직 블록은 다음 규칙에 따라 다르게 동작합니다.
- 매직 블록은 양옆 중 한쪽에 빈 공간이 생기면 옆으로 이동합니다.
- 아래쪽에 빈 공간이 생기면 일반 색 블록처럼 떨어집니다.
플레이어는 다음 규칙에 따라 게임과 상호작용합니다.
- 플레이어는 가로, 세로, 대각선으로 인접한 색 블록을 드래그해서 연결할 수 있습니다.
- 연결된 블록은 플레이어가 터치 입력을 놓는 즉시, 즉 손가락을 떼는 즉시 사라집니다.
- 매직 블록은 드래그에 반응하지 않으며 수동으로 연결할 수 없습니다.
- 하지만 매직 블록은 가로 또는 세로로 서로 연결되면 반응합니다. 즉, 이 조건에서는 자동으로 연결됩니다.
- 플레이어가 보드 위의 모든 매직 블록을 자동 연결하는 데 성공하면 레벨이 완료됩니다.
난이도는 보드에 놓이는 매직 블록의 수를 결정합니다.
개요
모든 프로젝트와 마찬가지로, 큰 흐름에서 구현에 접근할 계획을 세워야 합니다. 이 게임을 구조화하고 만드는 방법은 여러 가지가 있습니다. 원한다면 기술적으로는 GUI 시스템 안에서 게임 전체를 구현할 수도 있습니다. 하지만 게임 오브젝트와 스프라이트로 게임을 만들고, 화면 GUI와 HUD 요소에는 GUI API를 사용하는 것이 게임을 만드는 데 가장 자연스러운 방식인 경우가 많으므로 이 튜토리얼에서도 그 길을 따릅니다.
파일 수가 많지 않을 것으로 예상되므로 프로젝트 폴더 구조는 아주 단순하게 유지합니다.

- main
- 이 폴더에는 게임의 모든 로직이 들어갑니다. 모든 스크립트, 게임 오브젝트 파일, 컬렉션 파일, GUI 파일 등이 이 폴더에 위치합니다. 이 폴더를 여러 폴더로 나누거나 서브폴더를 유지하고 싶다면 그렇게 해도 괜찮습니다.
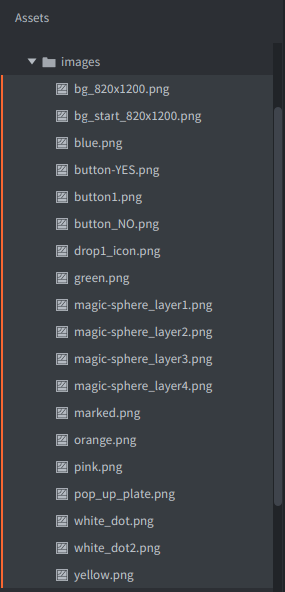
- images
- 모든 이미지 에셋은 이 폴더에 둡니다.
- fonts
- 텍스트 렌더링에 사용되는 폰트는 여기에 둡니다.
- input
- 입력 바인딩은 이 폴더에 둡니다.
프로젝트 설정하기
game.project 파일은 대부분 기본 설정을 유지하지만 결정해야 할 설정이 몇 가지 있습니다. 먼저 게임의 해상도를 선택해야 합니다. 나중에 해상도를 바꾸는 것은 꽤 쉽지만, 최종 게임에서는 타겟 기기의 해상도나 종횡비와 관계없이 게임이 보기 좋게 나오도록 몇 가지 작업을 해야 합니다.
여기서는 해상도를 iPhone 4의 네이티브 해상도인 640x960 픽셀로 설정했습니다. 이 해상도는 많은 모니터에도 잘 맞기 때문에 컴퓨터에서 플레이테스트하기도 편합니다. 다른 해상도로 작업하고 싶다면 몇 가지 값을 다르게 조정하기만 하면 됩니다.
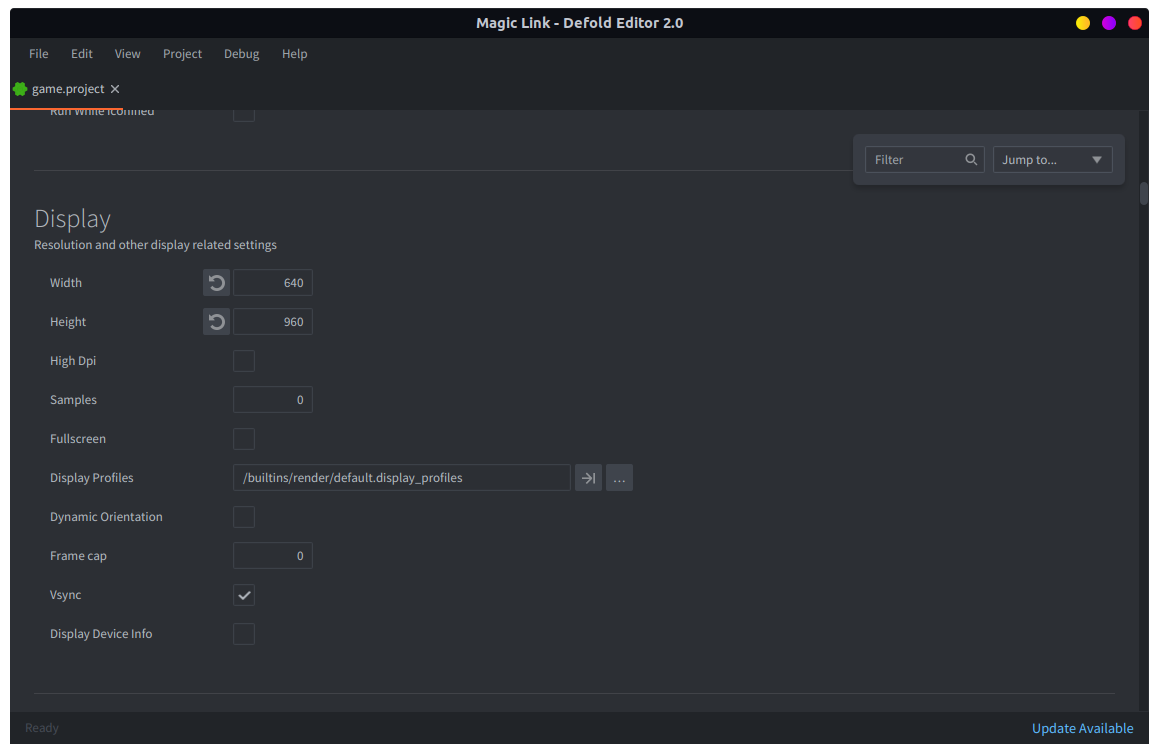
또한 렌더링되는 스프라이트의 최대 개수를 늘려야 합니다. 원한다면 다음 섹션으로 건너뛰었다가 콘솔에서 스프라이트 한도에 도달했다는 알림을 받은 뒤 여기로 돌아와도 됩니다.

필요한 스프라이트의 최대 개수를 계산할 수 있습니다.
- 게임 보드는 7x9 블록을 담습니다. 보드에는 가장자리 주변의 여백과 위쪽 GUI 요소를 위한 공간도 필요합니다. 따라서 블록 크기는 대략 90x90 픽셀이 됩니다. 이보다 작으면 작은 휴대폰 화면에서 상호작용하기에 너무 작아집니다.
- 각 블록은 스프라이트 하나입니다. 블록의 색을 설정하기 위해 한 프레임짜리 애니메이션을 사용합니다.
- 일부 블록은 매직 블록이 되며, 각 매직 블록의 특수 효과에 스프라이트 4개를 사용합니다.
- 연결 그래픽에는 요소마다 스프라이트 하나가 필요합니다. 최악의 경우, 플레이어가 어떻게든 보드 전체를 연결하면 추가로 61개의 스프라이트가 필요합니다. 단, 드래그로 연결할 수 없는 매직 블록 2개는 제외합니다.
따라서 최대 30개의 매직 블록이 있다고 가정해 보겠습니다. 보드는 63개의 블록, 즉 스프라이트로 구성됩니다. 이 중 30개의 매직 블록은 특수 효과용 스프라이트 4개씩을 추가합니다. 이는 추가 스프라이트 120개입니다. 따라서 연결 그래픽까지 포함하면, 이 경우 최대 33개이므로 매 프레임 최소 120 + 33 = 153개의 스프라이트를 그려야 합니다. 가장 가까운 2의 거듭제곱은 256입니다.
하지만 최댓값을 256으로 설정하는 것만으로는 충분하지 않습니다. 보드를 지우고 다시 설정할 때마다 현재 게임 오브젝트를 모두 삭제하고 새로 스폰합니다. 스프라이트 수는 해당 프레임 동안 살아 있는 모든 오브젝트를 감당해야 합니다. 여기에는 삭제된 오브젝트도 포함됩니다. 삭제된 오브젝트는 프레임 끝에서 제거되기 때문입니다. 따라서 스프라이트 최대 개수를 512로 설정하면 충분합니다.
![]()
그래픽 에셋 추가하기
게임에 필요한 모든 에셋은 미리 준비되어 있습니다. 이 에셋들을 512x512 픽셀 이미지로 추가하고, 엔진이 타겟 크기로 축소하도록 합니다.
프로젝트 설정에서 hidpi 를 활성화하면 backbuffer가 고해상도가 됩니다. 큰 이미지를 축소해서 그리면 Retina 화면에서 매우 선명하게 보입니다.
블록 외에도 “connector” 이미지와 효과 스프라이트가 포함되어 있습니다. 배경 이미지도 두 개 있습니다. 하나는 게임 보드의 배경으로 사용하고, 하나는 메인 메뉴에 사용합니다. 모든 이미지를 images 폴더에 추가한 다음 sprites.atlas 아틀라스 파일을 만듭니다. 아틀라스 파일을 열고 모든 이미지를 추가합니다.
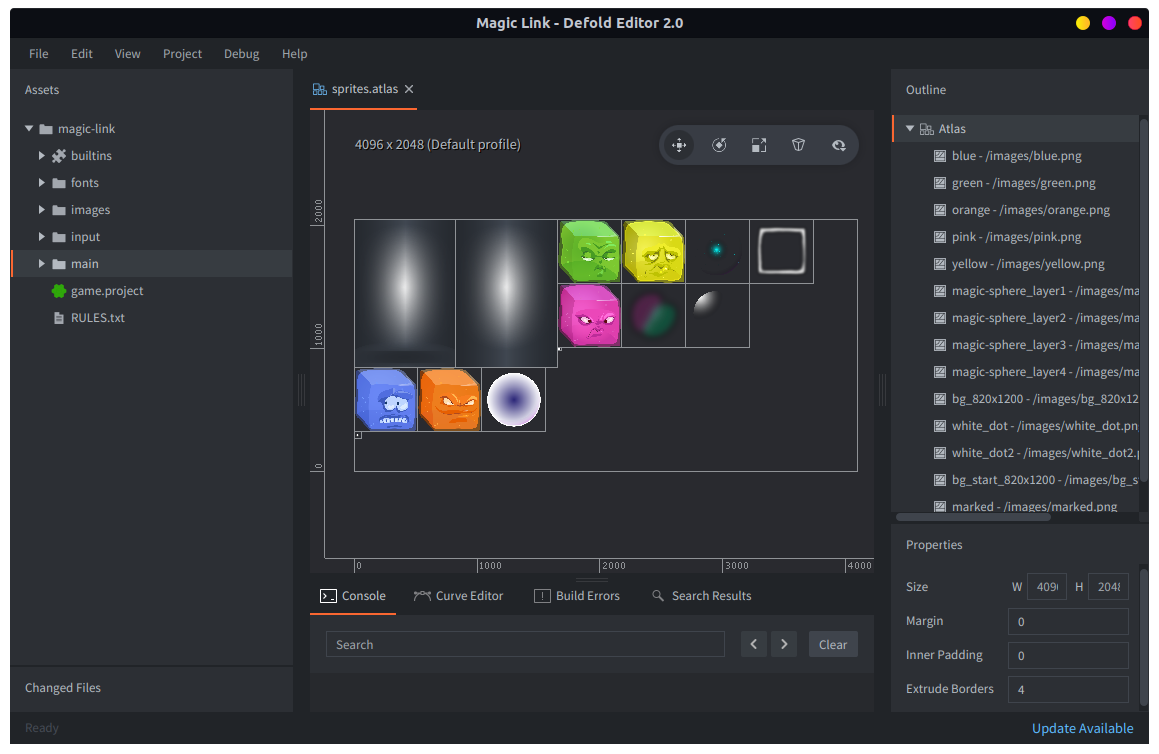
버튼과 팝업 같은 GUI 요소를 만드는 데 사용되는 GUI 이미지들도 있습니다. 이 이미지들은 gui.atlas 라는 별도의 아틀라스에 추가합니다.
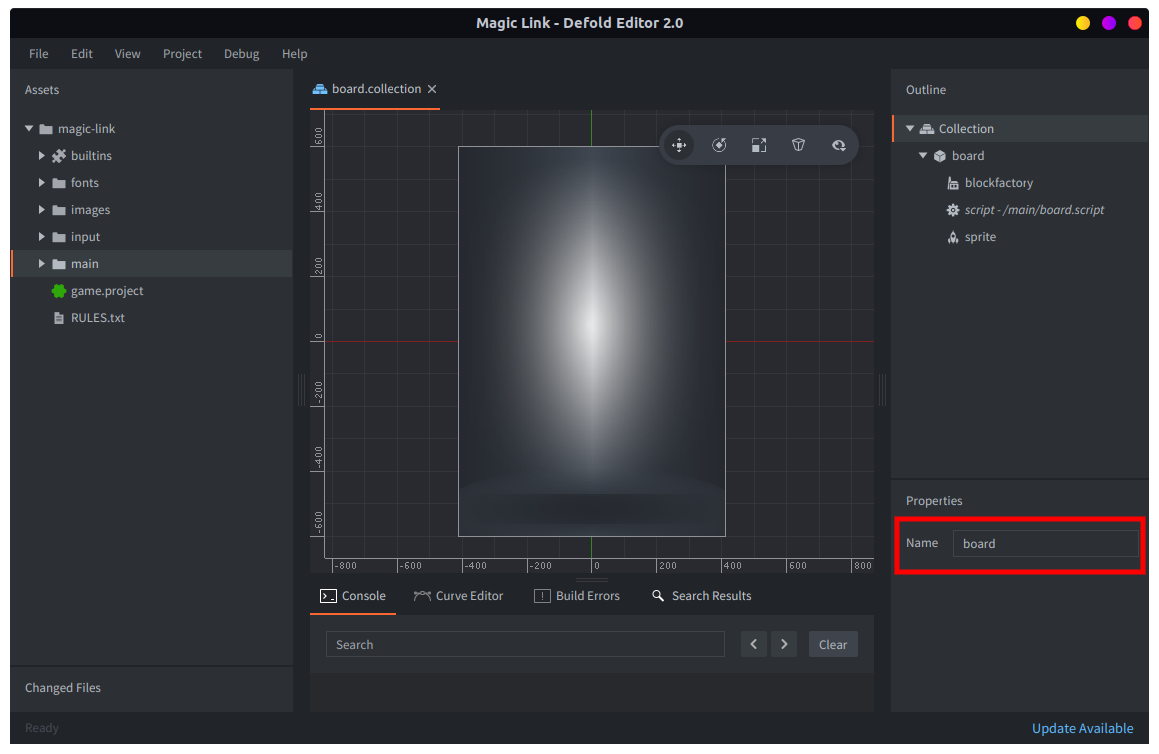
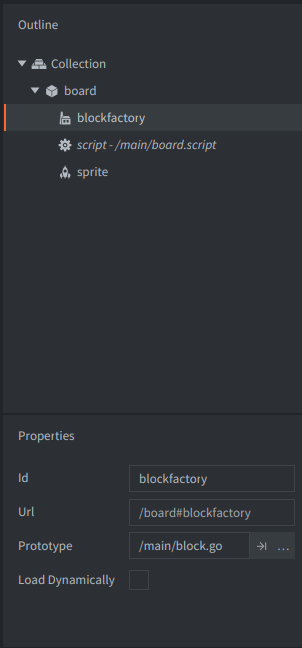
보드 생성하기
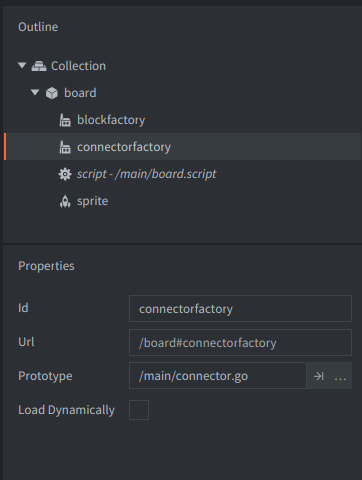
첫 번째 단계는 보드 로직을 만드는 것입니다. 보드는 게임플레이 중 화면에 표시되는 모든 것을 포함하는 자체 컬렉션에 위치합니다. 지금 필요한 것은 “blockfactory” 팩토리 컴포넌트와 스크립트뿐입니다. 나중에는 연결용 팩토리, 메인 메뉴 GUI 컴포넌트, 마지막으로 메인 메뉴에서 게임플레이를 시작하는 로딩 메커니즘과 메뉴로 나가는 방법을 추가합니다.
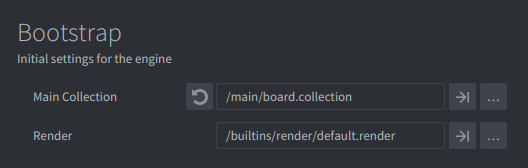
main폴더에board.collection을 만듭니다. 나중에 주소를 지정할 수 있도록 이름을 “board”로 지정해야 합니다. 배경 스프라이트 컴포넌트를 추가한다면 Z 위치를 -1로 설정해야 합니다. 그렇지 않으면 나중에 스폰할 모든 블록 뒤에 그려지지 않습니다.- 쉽게 테스트할 수 있도록 game.project 에서 Main Collection (Bootstrap 아래)을 임시로
/main/board.collection로 설정합니다.
board.script 스크립트 파일에는 보드 자체와 보드 안의 블록에 관한 모든 로직이 들어갑니다. 보드를 만드는 함수부터 작성하고, init()에서 임시로 호출합니다. 지금은 사용하지 않지만 나중에 유용하게 쓸 함수 두 개도 추가합니다.
filter()- 이 함수는 아이템(블록) 목록을 필터링할 수 있게 해 줍니다.
build_blocklist()- 보드 위의 모든 블록을 1차원 목록으로 펼친 리스트를 만듭니다. 이렇게 하면 이 목록을 필터링할 수 있습니다.
보드가 만들어진 뒤에는 모든 블록을 담는 두 가지 데이터 집합인 self.blocks와 self.board를 사용합니다.
-- board.script
go.property("timer", 0)     -- 이벤트 타이밍에 사용
local blocksize = 80        -- 블록 중심 사이의 거리
local edge = 40             -- 왼쪽 및 오른쪽 가장자리.
local bottom_edge = 50      -- 아래쪽 가장자리.
local boardwidth = 7        -- 열 수
local boardheight = 9       -- 행 수
local centeroff = vmath.vector3(8, -8, 0) -- 블록 이미지 아래쪽에 그림자가 있으므로 connector gfx의 중심 오프셋
local dropamount = 3        -- 한 번의 "drop"에서 떨어지는 블록 수
local colors = { hash("orange"), hash("pink"), hash("blue"), hash("yellow"), hash("green") }

--
-- filter(function, table)
-- 예: filter(is_even, {1,2,3,4}) -> {2,4}
--
local function filter(func, tbl)
    local new = {}
    for i, v in pairs(tbl) do
        if func(v) then
            new[i] = v
        end
    end
    return new
end

--
-- 쉽게 필터링할 수 있도록 블록 목록을 1차원으로 만듭니다.
--
local function build_blocklist(self)
    self.blocks = {}
    for x, l in pairs(self.board) do
        for y, b in pairs(self.board[x]) do
            table.insert(self.blocks, { id = b.id, color = b.color, x = b.x, y = b.y })
        end
    end
end

--
-- INIT
--
function init(self)
    self.board = {}             -- 보드 구조를 담습니다.
    self.blocks = {}            -- 모든 블록의 목록. 선택 시 쉽게 필터링하는 데 사용합니다.
    self.chain = {}             -- 현재 선택 chain
    self.connectors = {}        -- 선택 chain을 표시하는 connector 요소
    self.num_magic = 3          -- 보드 위 매직 블록 수
    self.drops = 1              -- 사용할 수 있는 drop 수
    self.magic_blocks = {}      -- 줄지어 있는 매직 블록
    self.dragging = false       -- 드래그 터치 입력
    msg.post(".", "acquire_input_focus")
    msg.post("#", "start_level")
end

local function build_board(self)
    math.randomseed(os.time())
    local pos = vmath.vector3()
    local c
    local x = 0
    local y = 0
    for x = 0,boardwidth-1 do
        pos.x = edge + blocksize / 2 + blocksize * x
        self.board[x] = {}
        for y = 0,boardheight-1 do
            pos.y = bottom_edge + blocksize / 2 + blocksize * y
            -- z 계산
            pos.z = x * -0.1 + y * 0.01 -- <1>
            c = colors[math.random(#colors)]    -- 무작위 색 선택
            local id = factory.create("#blockfactory", pos, null, { color = c })
            self.board[x][y] = { id = id, color = c,  x = x, y = y }
        end
    end

    -- 쉽게 필터링할 수 있는 1d 목록을 만듭니다.
    build_blocklist(self)
end

function on_message(self, message_id, message, sender)
    if message_id == hash("start_level") then
        build_board(self)
    end
end
- 블록 그래픽이 서로 겹치므로 올바른 순서로 그려야 한다는 점에 유의하세요. 이는 각 블록의 z 좌표를 설정해서 처리합니다. 이 값은 배경 스프라이트가 있는 -1보다 충분히 위에 유지됩니다.
보드 로직은 “block” 게임 오브젝트를 “blockfactory” 팩토리 컴포넌트를 통해 스폰합니다. 이 동작이 가능하도록 블록 게임 오브젝트를 만들어야 합니다. 블록에는 스크립트와 스프라이트가 있습니다. 스프라이트의 기본 애니메이션은 sprites.atlas 안의 색 블록 중 아무 것으로 설정한 다음, 스폰될 때 블록이 올바른 색을 갖도록 block.script 에 코드를 추가합니다.
-- block.script
go.property("color", hash("none"))

function init(self)
    go.set_scale_xy(0.18)     -- render scaled down without changing Z

    if self.color ~= nil then
        sprite.play_flipbook("#sprite", self.color)
    else
        msg.post("#sprite", "disable")
    end
end
“blockfactory” 팩토리 컴포넌트의 Prototype 을 새 block.go 게임 오브젝트 파일로 설정합니다.
이제 게임을 실행하면 보드가 무작위 색 블록으로 채워진 것을 볼 수 있습니다.
상호작용
이제 보드가 생겼으므로 사용자 상호작용을 추가해야 합니다. 먼저 input 폴더의 game.input_binding 에서 입력 바인딩을 정의합니다. game.project 설정이 입력 바인딩 파일을 사용하도록 되어 있는지 확인하세요.
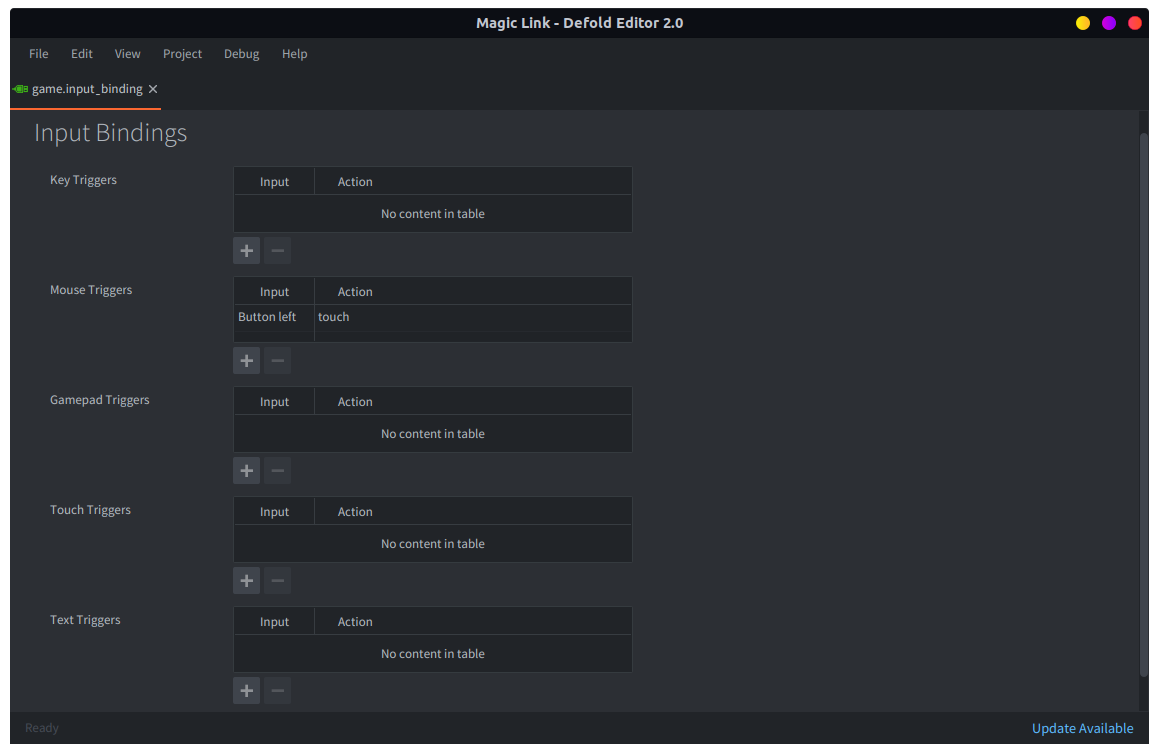
바인딩은 하나만 필요하며, MOUSE_BUTTON_LEFT를 “touch”라는 동작 이름에 할당합니다. 이 게임은 멀티 터치를 사용하지 않으며, 편의를 위해 Defold는 한 손가락 터치 입력을 왼쪽 마우스 클릭으로 변환합니다.
입력을 처리하는 일은 보드가 맡으므로 board.script 에 해당 코드를 추가해야 합니다.
-- board.script
function on_input(self, action_id, action)
    if action_id == hash("touch") and action.value == 1 then
        -- 어떤 블록을 터치했거나 드래그로 지나갔는가?
        local x = math.floor((action.x - edge) / blocksize)
        local y = math.floor((action.y - bottom_edge) / blocksize)

        if x < 0 or x >= boardwidth or y < 0 or y >= boardheight or self.board[x][y] == nil then
            -- 보드 바깥.
            return
        end

        if action.pressed then
            -- 플레이어가 터치를 시작했습니다.
            msg.post(self.board[x][y].id, "make_orange")

            self.dragging = true
        elseif self.dragging then
            -- 이후 드래그
            msg.post(self.board[x][y].id, "make_green")
        end
    elseif action_id == hash("touch") and action.released then
        -- 플레이어가 터치를 놓았습니다.
        self.dragging = false
    end
end
make_orange와 make_green 메세지는 코드가 동작한다는 시각적 피드백을 얻기 위한 임시 메세지일 뿐입니다. 이 메세지를 처리하도록 block.script 에 코드를 추가해야 합니다.
-- block.script
function on_message(self, message_id, message, sender)
    if message_id == hash("make_orange") then
        sprite.play_flipbook("#sprite", hash("orange"))
    elseif message_id == hash("make_green") then
        sprite.play_flipbook("#sprite", hash("green"))
    end
end
이제 블록에는 먼저 make_orange 메세지가 하나 뿌려지고, 터치하거나 마우스를 누르고 있는 동안 make_green 메세지가 계속 뿌려집니다. 따라서 블록은 초록색으로 바뀌기 전에 아주 잠깐만 주황색으로 깜박일 가능성이 큽니다. 어쩌면 그조차 보이지 않을 수도 있습니다. 하지만 플레이어가 어떤 블록을 터치했는지는 확실히 알 수 있습니다. 입력이 처리되는 과정을 더 자세히 추적하고 싶다면 코드에 print() 또는 pprint() 호출을 넣어 보세요.
링크 표시하기
이제 플레이어가 블록을 연결했을 때 이를 표시하는 마커용 에셋이 필요합니다. 아이디어는 각 블록 위에 그래픽을 단순히 덮어 그려서 블록이 연결되었음을 보여주는 것입니다.
“connector” 스프라이트 이미지를 담는 “connector” 게임 오브젝트와, “board” 게임 오브젝트 안의 “connector factory” 팩토리 컴포넌트를 만들어야 합니다.
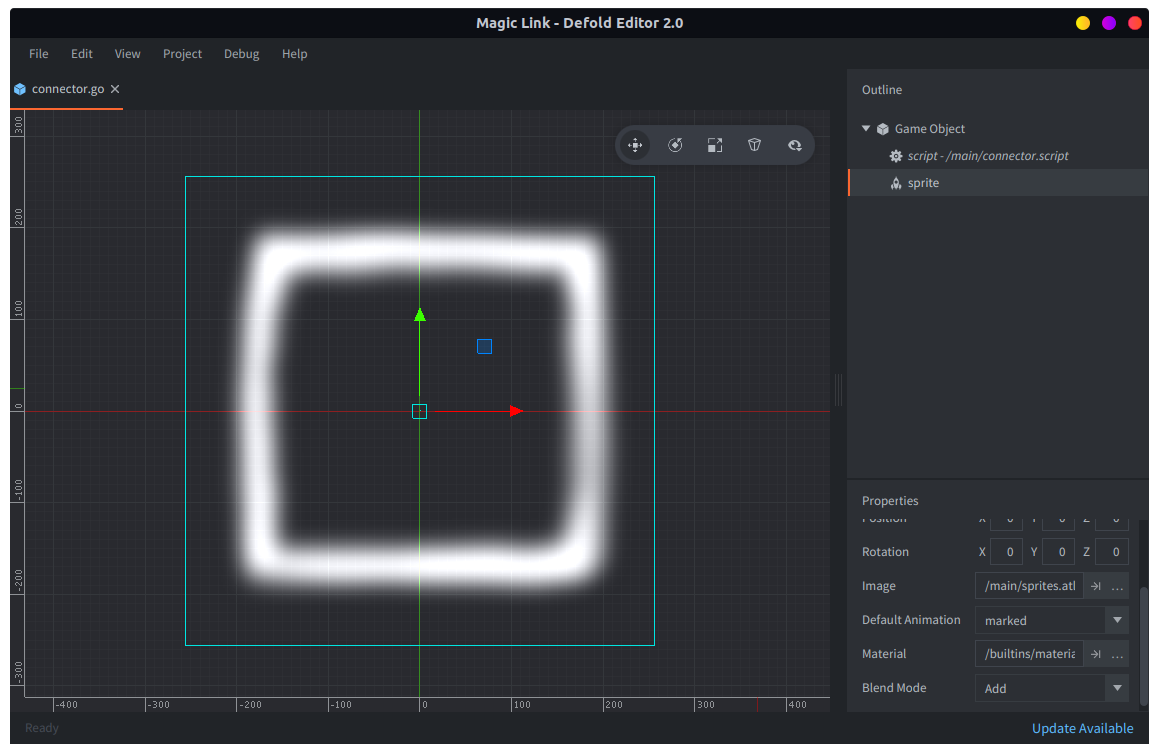
이 게임 오브젝트의 스크립트는 최소한이면 됩니다. 게임의 나머지 부분과 맞도록 그래픽을 스케일하고, Z 순서를 올바르게 설정하기만 하면 됩니다.
-- connector.script
function init(self)
    go.set_scale_xy(0.18)           -- Scale in 2D without changing Z.
    go.set(".", "position.z", 1)    -- 위에 놓습니다.
end
same_color_neighbors() 함수는 특정 블록(x, y 위치)에 인접하면서 같은 색인 블록 목록을 반환합니다. 이 함수는 self.blocks의 전체 1차원 블록 목록에 적용되는 filter() 함수를 사용합니다.
-- board.script
--
-- x, y에 있는 블록과 같은 색인 이웃 블록 목록을 반환합니다.
--
local function same_color_neighbors(self, x, y)
    local f = function (v)
        return (v.id ~= self.board[x][y].id) and
               (v.x == x or v.x == x - 1 or v.x == x + 1) and
               (v.y == y or v.y == y - 1 or v.y == y + 1) and
               (v.color == self.board[x][y].color)
    end
    return filter(f, self.blocks)
end
헬퍼 함수 in_blocklist()는 어떤 블록이 블록 목록 안에 존재하는지 확인합니다.
-- board.script
--
-- 블록 목록 안에 해당 블록이 있는가?
--
local function in_blocklist(blocks, block)
    for i, b in pairs(blocks) do
        if b.id == block then
            return true
        end
    end
    return false
end
터치와 드래그 입력을 처리하는 on_input()에서 이 함수들을 사용해 터치된 블록 링크를 구성합니다. 아직 매직 블록은 없지만 여기서는 매직 블록을 검사해서 무시하도록 해 둡니다.
-- board.script
function on_input(self, action_id, action)

    ...

    -- 매직 블록을 조작하려고 하면 무시합니다.
    if self.board[x][y].color == hash("magic") then
        return
    end

    if action.pressed then
        -- 터치된 블록과 같은 색인 이웃 목록
        self.neighbors = same_color_neighbors(self, x, y)
        self.chain = {}
        table.insert(self.chain, self.board[x][y])

        -- 블록 표시.
        p = go.get_position(self.board[x][y].id)
        local id = factory.create("#connectorfactory", p + centeroff)
        table.insert(self.connectors, id)

        self.dragging = true
    elseif self.dragging then
        -- 이후 드래그
        if in_blocklist(self.neighbors, self.board[x][y].id) and not in_blocklist(self.chain, self.board[x][y].id) then
            -- 같은 색 이웃 위로 드래그 중
            table.insert(self.chain, self.board[x][y])
            self.neighbors = same_color_neighbors(self, x, y)

            -- 블록 표시.
            p = go.get_position(self.board[x][y].id)
            local id = factory.create("#connectorfactory", p + centeroff)
            table.insert(self.connectors, id)
        end
    end
마지막으로 터치를 놓으면 모든 링크 connector를 시각적으로 제거합니다.
-- board.script
function on_input(self, action_id, action)

    ...

    elseif action_id == hash("touch") and action.released then
        -- 플레이어가 터치를 놓았습니다.
        self.dragging = false

        -- connector 그래픽 chain을 비웁니다.
        for i, c in ipairs(self.connectors) do
            go.delete(c)
        end
        self.connectors = {}
    end
end
연결된 블록 제거하기
이제 같은 색 블록을 연결할 수 있는 로직이 준비되었으므로 연결된 블록을 단순히 제거하는 일은 쉽습니다. 보드의 위치를 그냥 nil로 설정하지 않고 hash("removing")으로 설정하는 이유는, 나중에 매직 블록 로직을 만들 때 매직 블록이 새로 제거된 블록 자리로만 미끄러지도록 보장해야 하기 때문입니다. 여기서 보드 위치를 nil로 설정하면 새로 제거된 블록과 이전에 제거된 블록을 구분할 방법이 없습니다.
-- board.script
-- 현재 선택된 블록 chain을 제거합니다.
--
local function remove_chain(self)
    -- chain에 있는 모든 블록을 삭제합니다.
    for i, c in ipairs(self.chain) do
        self.board[c.x][c.y] = hash("removing")
        go.delete(c.id)
    end
    self.chain = {}
end
또한 hash("removing")으로 설정된 보드 위치를 실제로 제거, 즉 nil로 설정하는 함수도 필요합니다.
-- board.script
--
-- 제거된 블록을 nil로 설정합니다.
--
local function nilremoved(self)
    for y = 0,boardheight - 1 do
        for x = 0,boardwidth - 1 do
            if self.board[x][y] == hash("removing") then
                self.board[x][y] = nil
            end
        end
    end
end
아래쪽 블록이 제거되어 nil로 설정되면 남은 블록을 아래로 미끄러뜨리는 함수도 만듭니다. 보드를 열 단위로 왼쪽에서 오른쪽으로 순회하고, 각 열은 아래에서 위로 훑습니다. 비어 있는 nil 위치를 만나면 그 위치 위에 있는 모든 블록을 아래로 미끄러뜨립니다.
-- board.script
--
-- 모든 블록에 아래로 이동하는 로직을 적용합니다.
--
local function slide_board(self)
    -- 남아 있는 모든 블록을 빈 자리로 아래로 미끄러뜨립니다.
    -- 열 단위로 처리하면 쉽습니다.
    local dy = 0
    local pos = vmath.vector3()
    for x = 0,boardwidth - 1 do
        dy = 0
        for y = 0,boardheight - 1 do
            if self.board[x][y] ~= nil then
                if dy > 0 then
                    -- dy 단계만큼 아래로 이동
                    self.board[x][y - dy] = self.board[x][y]
                    self.board[x][y] = nil
                    -- 새 위치 계산
                    self.board[x][y - dy].y = self.board[x][y - dy].y - dy
                    go.animate(self.board[x][y-dy].id, "position.y", go.PLAYBACK_ONCE_FORWARD, bottom_edge + blocksize / 2 + blocksize * (y - dy), go.EASING_OUTBOUNCE, 0.3)
                    -- 새 z 계산
                    go.set(self.board[x][y-dy].id, "position.z", x * -0.1 + (y-dy) * 0.01)
                end
            else
                dy = dy + 1
            end
        end
    end
    -- blocklist를 업데이트해야 합니다.
    build_blocklist(self)
end
이제 터치를 놓았고 self.chain 안에 블록이 있을 때 on_input()에서 이 함수들을 호출하기만 하면 됩니다.
-- board.script
function on_input(self, action_id, action)

    ...

    elseif action_id == hash("touch") and action.released then
        -- 플레이어가 터치를 놓았습니다.
        self.dragging = false

        if #self.chain > 1 then
            -- 블록 chain이 있습니다. 보드에서 제거하고 남은 블록을 아래로 미끄러뜨립니다.
            remove_chain(self)
            nilremoved(self)
            slide_board(self)
        end

        -- connector 그래픽 chain을 비웁니다.
        for i, c in ipairs(self.connectors) do
            go.delete(c)
        end
        self.connectors = {}
    end
매직 블록 로직
이제 매직 블록을 추가할 차례입니다. 우선 블록이 매직 블록이 될 수 있도록 만드는 기능을 추가해 봅시다. 그러면 채워진 보드에서 별도의 처리를 통해 원하는 블록을 매직 블록으로 변환할 수 있습니다. 매직 블록을 조금 더 돋보이게 하기 위해, 먼저 매직 블록에서 스폰할 수 있는 magic_fx.go 게임 오브젝트 형태의 애니메이션 매직 효과를 만듭니다.
이 게임 오브젝트에는 스프라이트 두 개가 들어 있습니다. 하나는 “magic” 색, 즉 magic-sphere_layer2.png 이미지를 사용하는 스프라이트이고, 다른 하나는 “light” 효과, 즉 magic-sphere_layer3.png 이미지를 사용하는 스프라이트입니다. 이 오브젝트는 스폰될 때 프로퍼티 direction 값에 따라 회전하도록 설정됩니다. 또한 lights_on과 lights_off라는 두 메세지를 수신해서 light 효과 스프라이트를 제어합니다.
새 스크립트를 만들고 magic_fx.go 에 스크립트 컴포넌트로 추가합니다.
-- magic_fx.script
go.property("direction", hash("left"))

function init(self)
    msg.post("#", "lights_off")
    if self.direction == hash("left") then
        go.set(".", "euler.z", 0)
        go.animate(".", "euler.z", go.PLAYBACK_LOOP_FORWARD, 360,  go.EASING_LINEAR, 3 + math.random())
    else
        go.set(".", "euler.z", 0)
        go.animate(".", "euler.z", go.PLAYBACK_LOOP_FORWARD, -360,  go.EASING_LINEAR, 2 + math.random())
    end
end

function on_message(self, message_id, message, sender)
    if message_id == hash("lights_on") then
        msg.post("#light", "enable")
    elseif message_id == hash("lights_off") then
        msg.post("#light", "disable")
    end
end
이제 매직 블록은 make_magic 메세지를 받으면 magic_fx 게임 오브젝트 두 개를 스폰합니다. 각각 반대 방향으로 회전하면서 블록 내부에 멋진 색상의 움직임을 만듭니다. 또한 magic-sphere_layer4.png 이미지를 사용하는 스프라이트 하나를 block.go 에 추가합니다. 이 이미지는 스폰된 효과보다 높은 Z에 배치되며, 매직 구체의 껍질 또는 “cover”를 그립니다.
블록 게임 오브젝트에 Factory 컴포넌트를 추가하고 Prototype 으로 magic_fx.go 게임 오브젝트를 사용하도록 지정해야 합니다. 블록 스크립트는 lights_on과 lights_off 메세지도 수신하고, 이를 스폰된 오브젝트로 전달해야 합니다. 스폰된 오브젝트는 블록이 삭제될 때 함께 삭제되어야 한다는 점에도 유의하세요. 이는 블록의 final() 함수에서 처리합니다. 이 모든 작업은 block.script 에서 일어납니다.
-- block.script
function init(self)
    go.set_scale_xy(0.18) -- render scaled down without changing Z

    self.fx1 = nil
    self.fx2 = nil

    msg.post("#cover", "disable")

    if self.color ~= nil then
        sprite.play_flipbook("#sprite", self.color)
    else
        msg.post("#sprite", "disable")
    end
end

function final(self)
    if self.fx1 ~= nil then
        go.delete(self.fx1)
    end

    if self.fx2 ~= nil then
        go.delete(self.fx2)
    end
end

function on_message(self, message_id, message, sender)
    if message_id == hash("make_magic") then
        self.color = hash("magic")
        msg.post("#cover", "enable")
        msg.post("#sprite", "enable")
        sprite.play_flipbook("#sprite", hash("magic-sphere_layer1"))

        self.fx1 = factory.create("#fxfactory", p, nil, { direction = hash("left") })
        self.fx2 = factory.create("#fxfactory", p, nil, { direction = hash("right") })

        go.set_parent(self.fx1, go.get_id())
        go.set_parent(self.fx2, go.get_id())

        go.set(self.fx1, "position.z", 0.01)
        go.set(self.fx1, "scale.xy", 1)
        go.set(self.fx2, "position.z", 0.02)
        go.set(self.fx2, "scale.xy", 1)
    elseif message_id == hash("lights_on") or message_id == hash("lights_off") then
        msg.post(self.fx1, message_id)
        msg.post(self.fx2, message_id)
    end
end
이제 매직 블록을 만들 수 있고, 매직 블록에 빛을 켤 수도 있습니다. 이 효과는 매직 블록이 다른 매직 블록 옆에 놓였음을 표시하는 데 사용합니다.
이제 보드를 블록으로 채우는 코드를 수정해서 매직 블록도 생성되도록 해야 합니다.
-- board.script
local function build_board(self)

    ...

    -- 매직 블록을 배치합니다.
    local rand_x = 0
    local rand_y
    for y = 0, boardheight - 1, boardheight / self.num_magic do
        local set = false
        while not set do
            rand_y = math.random(math.floor(y), math.min(boardheight - 1, math.floor(y + boardheight / self.num_magic)))
            rand_x = math.random(0, boardwidth - 1)
            if self.board[rand_x][rand_y].color ~= hash("magic") then
                msg.post(self.board[rand_x][rand_y].id, "make_magic")
                self.board[rand_x][rand_y].color = hash("magic")
                set = true
            end
        end
    end

    -- 쉽게 필터링할 수 있는 1d 목록을 만듭니다.
    build_blocklist(self)
end
매직 블록의 핵심 메커니즘은 옆에 있는 다른 블록이 사라졌을 때 옆으로 미끄러지는 능력입니다. 이 메커니즘의 모든 세부 사항은 board.script 의 slide_magic_blocks() 함수에 반영합니다. 알고리즘은 단순합니다.
- 보드의 각 행마다 매직 블록 목록
M을 만듭니다. - 목록
M의 크기가 줄어들지 않을 때까지 목록 안의 각 매직 블록을 순회합니다. 각 반복에서:- 매직 블록 아래 위치가
hash("removing")블록 위치이면 목록M에서 제거하기만 합니다. - 매직 블록 옆에
hash("removing")으로 표시된 빈 공간이 있으면 그곳으로 미끄러뜨리고, 이전 위치를hash("removing")으로 설정한 뒤 목록M에서 제거합니다.
- 매직 블록 아래 위치가
-- board.script
-- 매직 블록에 이동 로직을 적용합니다. hash("removing")으로
-- 제거 표시된 위치로만 미끄러집니다.
--
local function slide_magic_blocks(self)
    -- 먼저 미끄러져야 하는 쪽으로 모든 매직 블록을 미끄러뜨립니다.
    -- 행 단위로 처리할 때 가장 잘 작동합니다.
    local row_m
    for y = 0,boardheight - 1 do
        row_m = {}
        -- 이 행의 매직 블록 목록을 만듭니다.
        for x = 0,boardwidth - 1 do
            if self.board[x][y] ~= nil and self.board[x][y] ~= hash("removing") and self.board[x][y].color == hash("magic") then
                table.insert(row_m, self.board[x][y])
            end
        end

        local mc = #row_m + 1
        -- 목록을 훑으며 가능하면 미끄러뜨리고 제거합니다. 목록이 줄어들지 않을 때까지 반복합니다.
        while #row_m < mc do
            mc = #row_m
            for i, m in pairs(row_m) do
                local x = m.x
                if y > 0 and self.board[x][y-1] == hash("removing") then
                    -- 아래쪽 구멍은 아무것도 하지 않습니다.
                    row_m[i] = nil
                elseif x > 0 and self.board[x-1][y] == hash("removing") then
                    -- 왼쪽에 구멍이 있습니다! 매직 블록을 그곳으로 미끄러뜨립니다.
                    self.board[x-1][y] = self.board[x][y]
                    self.board[x-1][y].x = x - 1
                    go.animate(self.board[x][y].id, "position.x", go.PLAYBACK_ONCE_FORWARD, edge + blocksize / 2 + blocksize * (x - 1), go.EASING_OUTBOUNCE, 0.3)
                    -- 새 z 계산
                    go.set(self.board[x][y].id, "position.z", (x - 1) * -0.1 + y * 0.01)
                    self.board[x][y] = hash("removing") -- 나중에 nil 처리됩니다.
                    row_m[i] = nil
                elseif x < boardwidth - 1 and self.board[x + 1][y] == hash("removing") then
                    -- 오른쪽에 구멍이 있습니다. 매직 블록을 그곳으로 미끄러뜨립니다.
                    self.board[x+1][y] = self.board[x][y]
                    self.board[x+1][y].x = x + 1
                    go.animate(self.board[x+1][y].id, "position.x", go.PLAYBACK_ONCE_FORWARD, edge + blocksize / 2 + blocksize * (x + 1), go.EASING_OUTBOUNCE, 0.3)
                    -- 새 z 계산
                    go.set(self.board[x+1][y].id, "position.z", (x + 1) * -0.1 + y * 0.01)
                    self.board[x][y] = hash("removing") -- 나중에 nil 처리됩니다.
                    row_m[i] = nil
                end
            end
        end
    end
end
on_input()에서 이 함수를 호출해 메커니즘을 시험해 볼 수 있습니다.
-- board.script
function on_input(self, action_id, action)

    ...

    elseif action_id == hash("touch") and action.released then
        -- 플레이어가 터치를 놓았습니다.
        self.dragging = false

        if #self.chain > 1 then
            -- 블록 chain이 있습니다. 보드에서 제거합니다.
            remove_chain(self)
            slide_magic_blocks(self)
            nilremoved(self)
            -- 남은 블록을 아래로 미끄러뜨립니다.
            slide_board(self)
        end
        self.chain = {}
        -- chain을 비우면 connector 그래픽이 지워집니다.
        for i, c in ipairs(self.connectors) do
            go.delete(c)
        end
        self.connectors = {}
    end
이제 블록을 제거할 때 위치에 중간 hash("removing") “태그”를 사용한 이유가 분명해집니다. 이것이 없으면 매직 블록이 옆의 어떤 빈 위치로든 이리저리 미끄러질 것입니다. 흥미로운 메커니즘일 수는 있지만 이 작은 게임에서 의도한 것은 아닙니다.
이제 매직 블록이 연결되어 있는지, 즉 왼쪽, 오른쪽, 위 또는 아래에 서로 붙어 있는지 감지하는 로직이 필요합니다. 또한 보드 위의 모든 매직 블록이 연결되어 있는지도 알아야 합니다. 사용되는 알고리즘은 꽤 단순합니다.
- 보드 위의 모든 매직 블록 목록
M을 만듭니다. - 목록
M의 각 블록에 대해:- 블록에
region이 설정되어 있지 않으면 영역 번호R을 할당합니다. 처음 값은1입니다. - 표시되지 않은 모든 이웃 블록에 같은 영역 번호
R을 표시하고, 그 이웃의 이웃, 다시 그 이웃의 이웃으로 계속 반복합니다. - 영역 번호
R을1증가시킵니다.
- 블록에

다음은 알고리즘 구현입니다.
-- board.script
--
-- 현재 모든 매직 블록 목록을 만듭니다.
--
local function magic_blocks(self)
    local magic = {}
    for x = 0,boardwidth - 1 do
        for y = 0,boardheight - 1 do
            if self.board[x][y] ~= nil and self.board[x][y].color == hash("magic") then
                table.insert(magic, self.board[x][y])
            end
        end
    end
    return magic
end

--
-- 인접한 매직 블록을 필터링합니다.
--
local function adjacent_magic_blocks(blocks, block)
    return filter(function (e)
        return (block.x == e.x and math.abs(block.y - e.y) == 1) or
            (block.y == e.y and math.abs(block.x - e.x) == 1)
    end, blocks)
end

--
-- 영역을 이웃으로 전파합니다.
--
local function mark_neighbors(blocks, block, region)
    local neighbors = adjacent_magic_blocks(blocks, block)
    for i, m in pairs(neighbors) do
        if m.region == nil then
            m.region = region
            mark_neighbors(blocks, m, region)
        end
    end
end

--
-- 모든 매직 블록 영역을 표시합니다.
--
local function mark_magic_regions(self)
    local m_blocks = magic_blocks(self)
    -- 1. 모든 영역 표시를 지우고 이웃 수를 셉니다.
    for i, m in pairs(m_blocks) do
        m.region = nil
        local n = 0
        for _ in pairs(adjacent_magic_blocks(m_blocks, m)) do n = n + 1 end
        m.neighbors = n
    end

    -- 2. 영역을 할당하고 전파합니다.
    local region = 1
    for i, m in pairs(m_blocks) do
        if m.region == nil then
            m.region = region
            mark_neighbors(m_blocks, m, region)
            region = region + 1
        end
    end
    return m_blocks
end
매직 블록 사이의 영역 수를 셀 수 있는 함수도 만듭니다. 영역 수가 1이면 모든 매직 블록이 연결되었다는 뜻입니다. 더불어 모든 매직 블록의 빛을 끄는 함수와, 이웃 매직 블록이 있는 매직 블록의 light 효과를 켜는 함수도 추가합니다.
-- board.script
--
-- 매직 블록 사이의 연결된 영역 수를 셉니다.
--
local function count_magic_regions(blocks)
    local maxr = 0
    for i, m in pairs(blocks) do
        if m.region > maxr then
            maxr = m.region
        end
    end
    return maxr
end

--
-- 나열된 모든 매직 블록의 빛을 끕니다.
--
local function shutdown_lined_up_magic(self)
    for i, m in ipairs(self.lined_up_magic) do
        msg.post(m.id, "lights_off")
    end
end

--
-- 모든 매직 블록의 highlight를 설정합니다.
--
local function highlight_magic(blocks)
    for i, m in pairs(blocks) do
        if m.neighbors > 0 then
            msg.post(m.id, "lights_on")
        else
            msg.post(m.id, "lights_off")
        end
    end
end
이제 이 로직들을 전체 흐름에 넣을 수 있습니다. 먼저 보드 생성은 무작위이므로, 아주 낮은 확률로 시작하자마자 승리 상태가 될 수 있습니다. 그런 일이 생기면 해당 보드를 버리고 다시 만듭니다.
-- board.script
--
-- 보드를 지웁니다.
--
local function clear_board(self)
    for y = 0,boardheight - 1 do
        for x = 0,boardwidth - 1 do
            if self.board[x][y] ~= nil then
                go.delete(self.board[x][y].id)
                self.board[x][y] = nil
            end
        end
    end
end

local function build_board(self)

    ...

    -- 쉽게 필터링할 수 있는 1d 목록을 만듭니다.
    build_blocklist(self)

    local magic_blocks = mark_magic_regions(self)
    if count_magic_regions(magic_blocks) == 1 then
        -- 시작부터 "Win" 상태입니다. 새 보드를 만듭니다.
        clear_board(self)
        build_board(self)
    end
    highlight_magic(magic_blocks)
end
나머지 로직은 on_input()에 들어갑니다. 아직 level_completed 메세지를 처리하는 코드는 없지만, 지금은 괜찮습니다.
-- board.script
function on_input(self, action_id, action)

    ...

    elseif action_id == hash("touch") and action.released then
        -- 플레이어가 터치를 놓았습니다.
        self.dragging = false

        if #self.chain > 1 then
            -- 블록 chain이 있습니다. 보드에서 제거하고 보드를 다시 채웁니다.
            remove_chain(self)
            slide_magic_blocks(self)
            nilremoved(self)
            -- 남은 블록을 아래로 미끄러뜨립니다.
            slide_board(self)

            local magic_blocks = mark_magic_regions(self)
            -- 인접한 매직 블록을 highlight합니다.
            if count_magic_regions(magic_blocks) == 1 then
                -- 승리!
                msg.post("#", "level_completed")
            end
            highlight_magic(magic_blocks)
        end
        self.chain = {}
        -- chain을 비우면 connector 그래픽이 지워집니다.
        for i, c in ipairs(self.connectors) do
            go.delete(c)
        end
        self.connectors = {}
    end
이제 모든 매직 블록을 연결해 승리 상태에 도달할 수 있습니다. 아직 모든 매직 블록을 연결했을 때 아무 일도 일어나지는 않습니다.
드롭
드롭(drop)의 아이디어는 단순한 진행 메커니즘을 추가하는 것입니다. 플레이어는 제한된 횟수만큼 드롭을 수행할 수 있습니다. DROP 버튼을 누르면 보드 위로 새로운 무작위 조각 몇 개가 단순히 떨어집니다. 플레이어는 드롭 하나로 시작하고, 레벨을 클리어할 때마다 드롭 하나를 추가로 받습니다. 드롭 메커니즘의 코드는 두 함수에 들어갑니다. 하나는 드롭이 들어갈 수 있는 위치 목록을 반환하고, 다른 하나는 애니메이션을 포함해 실제 드롭을 수행합니다.
-- board.script
--
-- drop 위치를 찾습니다.
--
local function dropspots(self)
    local spots = {}
    for x = 0, boardwidth - 1 do
        for y = 0, boardheight - 1 do
            if self.board[x][y] == nil then
                table.insert(spots, { x = x, y = y })
                break
            end
        end
    end
    -- dropamount보다 많으면 dropamount가 될 때까지 slot을 무작위로 제거합니다.
    for c = 1, #spots - dropamount do
        table.remove(spots, math.random(#spots))
    end
    return spots
end

--
-- drop을 수행합니다.
--
local function drop(self, spots)
    for i, s in pairs(spots) do
        local pos = vmath.vector3()
        pos.x = edge + blocksize / 2 + blocksize * s.x
        pos.y = 1000
        c = colors[math.random(#colors)]    -- 무작위 색 선택
        local id = factory.create("#blockfactory", pos, null, { color = c })
        go.animate(id, "position.y", go.PLAYBACK_ONCE_FORWARD, bottom_edge + blocksize / 2 + blocksize * s.y, go.EASING_OUTBOUNCE, 0.5)
        -- 새 z 계산
        go.set(id, "position.z", s.x * -0.1 + s.y * 0.01)

        self.board[s.x][s.y] = { id = id, color = c,  x = s.x, y = s.y }
    end

    -- blocklist를 다시 만듭니다.
    build_blocklist(self)
end
예를 들어 on_reload()에서 다음 코드를 실행하거나 임시 입력 동작에 연결해서 drop을 테스트할 수 있습니다.
s = dropspots(self)
if #s > 0 then
    -- drop을 수행합니다.
    drop(self, s)
end

메인 메뉴
이제 전체를 하나로 조립할 차례입니다. 먼저 시작 화면을 만들고 보드와 분리합니다. 1단계는 main_menu.gui 를 만들고 Start 버튼(텍스트 노드와 텍스쳐가 있는 box 노드), 타이틀 텍스트 노드, 장식용 블록 몇 개(텍스쳐가 있는 box 노드)를 배치하는 것입니다. GUI에 붙이는 main_menu.gui_script 스크립트는 init()에서 장식용 블록을 애니메이션합니다. 또한 start_game 메세지를 main 스크립트로 보내는 on_input()도 포함합니다. main 스크립트는 곧 만들 것입니다.
-- main_menu.gui_script
function init(self)
    msg.post(".", "acquire_input_focus")

    local bs = { "brick1", "brick2", "brick3", "brick4", "brick5", "brick6" }
    for i, b in ipairs(bs) do
        local n = gui.get_node(b)
        local rt = (math.random() * 3) + 1
        local a = math.random(-45, 45)
        gui.set_color(n, vmath.vector4(1, 1, 1, 0))

        gui.animate(n, "position.y", -100 - math.random(0, 50), gui.EASING_INSINE, 1 + rt, 0, nil, gui.PLAYBACK_LOOP_FORWARD)
        gui.animate(n, "color.w", 1, gui.EASING_INSINE, 1 + rt, 0, nil, gui.PLAYBACK_LOOP_FORWARD)
        gui.animate(n, "rotation.z", a, gui.EASING_INSINE, 1 + rt, 0, nil, gui.PLAYBACK_LOOP_FORWARD)
    end

    gui.animate(gui.get_node("start"), "color.x", 1, gui.EASING_INOUTSINE, 1, 0, nil, gui.PLAYBACK_LOOP_PINGPONG)
end

function on_input(self, action_id, action)
    if action_id == hash("touch") and action.pressed then
        local start = gui.get_node("start")

        if gui.pick_node(start, action.x, action.y) then
            msg.post("/main#script", "start_game")
        end
    end
end
게임을 시작하는 일은 곧 메인 메뉴 스크립트가 맡게 되므로, board.script 의 init()에 있던 임시 보드 설정 호출을 제거합니다.
-- board.script
--
-- INIT
--
function init(self)
    self.board = {}                -- 보드 구조를 담습니다.
    self.blocks = {}            -- 모든 블록의 목록. 선택 시 쉽게 필터링하는 데 사용합니다.

    self.chain = {}                -- 현재 선택 chain
    self.connectors = {}        -- 선택 chain을 표시하는 connector 요소
    self.num_magic = 3            -- 보드 위 매직 블록 수

    self.drops = 1                -- 사용할 수 있는 drop 수

    self.magic_blocks = {}        -- 줄지어 있는 매직 블록

    self.dragging = false        -- 드래그 터치 입력
end
main 스크립트는 전체 게임 상태를 유지하고 요청이 들어오면 게임을 시작합니다. 여기서 우리가 원하는 것은 main.collection 이 시작 시 보여 주는 데 필요한 최소한의 에셋만 포함하도록 만드는 것입니다. 이를 위해 main.collection 에 “main” 게임 오브젝트를 두고, 그 안에 메인 메뉴 GUI, 스크립트 컴포넌트, 그리고 가장 중요한 Collection Proxy 컴포넌트를 넣습니다.
컬렉션 프록시는 실행 중인 게임에 컬렉션을 동적으로 로드하고 언로드할 수 있게 해 줍니다. 지정된 컬렉션 파일을 대신해서 동작하며, 프록시에 메세지를 보내 동적 컬렉션을 로드, 초기화, 활성화, 비활성화, 언로드합니다. 사용 방법에 대한 완전한 설명은 Collection Proxy 문서를 참고하세요.
이 경우에는 collection proxy 컴포넌트의 Collection 프로퍼티를 “level”을 담고 있는 board.collection 으로 설정합니다.
이제 game.project 를 열고 bootstrap main_collection 을 /main/main.collectionc로 변경해야 합니다.
이제 게임을 시작한다는 것은 collection proxy에 메세지를 보내 보드를 로드, 초기화, 활성화한 다음, 메인 메뉴가 보이지 않도록 비활성화한다는 뜻입니다. 메인 메뉴로 돌아오는 것은 그 반대 작업입니다. 단, 프록시가 컬렉션을 로드한 상태라고 가정합니다.
-- main.script
function init(self)
    msg.post("#", "to_main_menu")
    self.state = "MAIN_MENU"
end

function on_message(self, message_id, message, sender)
    if message_id == hash("to_main_menu") then
        if self.state ~= "MAIN_MENU" then
            msg.post("#boardproxy", "unload")
        end
        msg.post("main:/main#menu", "enable") -- <1>
        self.state = "MAIN_MENU"
    elseif message_id == hash("start_game") then
        msg.post("#boardproxy", "load")
        msg.post("#menu", "disable")
    elseif message_id == hash("proxy_loaded") then
        -- 보드 컬렉션이 로드되었습니다...
        msg.post(sender, "init")
        msg.post("board:/board#script", "start_level", { difficulty = 1 }) -- <2>
        msg.post(sender, "enable")
        self.state = "GAME_RUNNING"
    end
end
- 소켓을 “main”이라고 부른다는 점에 유의하세요. 이는 main.collection 에 설정되어 있는지 확인해야 하는 이름입니다. 루트 노드를 선택하고 Name 프로퍼티가 “main”인지 확인하세요.
- 마찬가지로 로드된 컬렉션에는 그 컬렉션의 Name 프로퍼티로 이름 붙은 소켓을 통해 메세지를 보냅니다.
게임 내 GUI
board 스크립트에 마지막 로직을 추가하기 전에, 보드에 GUI 요소들을 추가해야 합니다. 먼저 보드 위쪽에 RESTART 버튼과 DROP 버튼을 추가합니다.
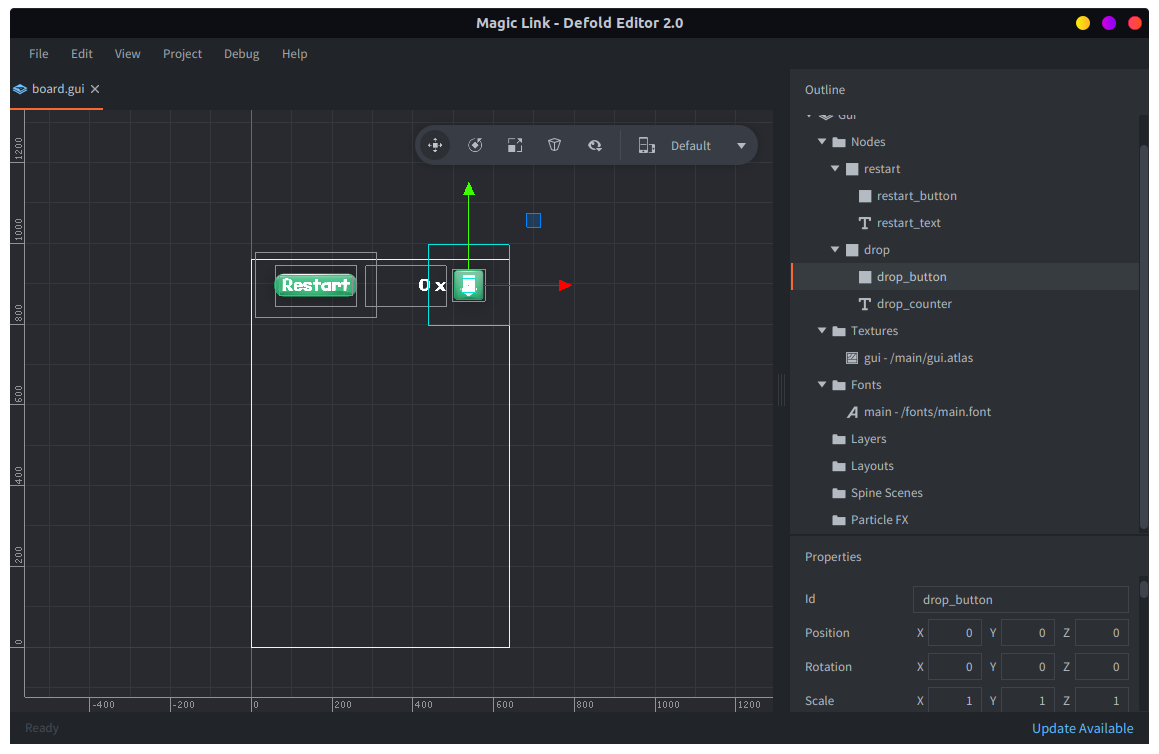
board GUI의 스크립트는 클릭 시 restart GUI 다이얼로그 요소로 메세지를 보내고, DROP 을 클릭하면 board 스크립트 자체로 메세지를 보냅니다.
-- board.gui_script
function init(self)
    msg.post("#", "show")
    msg.post("/restart#gui", "hide")
    msg.post("/level_complete#gui", "hide")
end

function on_message(self, message_id, message, sender)
    if message_id == hash("hide") then
        msg.post("#", "disable")
    elseif message_id == hash("show") then
        msg.post("#", "enable")
    elseif message_id == hash("set_drop_counter") then
        local n = gui.get_node("drop_counter")
        gui.set_text(n, message.drops .. " x")
    end
end

function on_input(self, action_id, action)
    if action_id == hash("touch") and action.pressed then
        local restart = gui.get_node("restart")
        local drop = gui.get_node("drop")

        if gui.pick_node(restart, action.x, action.y) then
            -- restart 다이얼로그 박스를 표시합니다.
            msg.post("/restart#gui", "show")
            msg.post("#", "hide")
        elseif gui.pick_node(drop, action.x, action.y) then
            msg.post("/board#script", "drop")
        end
    end
end
RESTART 다이얼로그는 단순합니다. restart.gui 로 만들고 간단한 스크립트를 붙입니다. 플레이어가 NO 를 클릭하면 아무것도 하지 않고, YES 를 클릭하면 board 스크립트에 restart_level 메세지를 보내며, Quit to main menu 를 클릭하면 main 스크립트에 to_main_menu 메세지를 보냅니다.
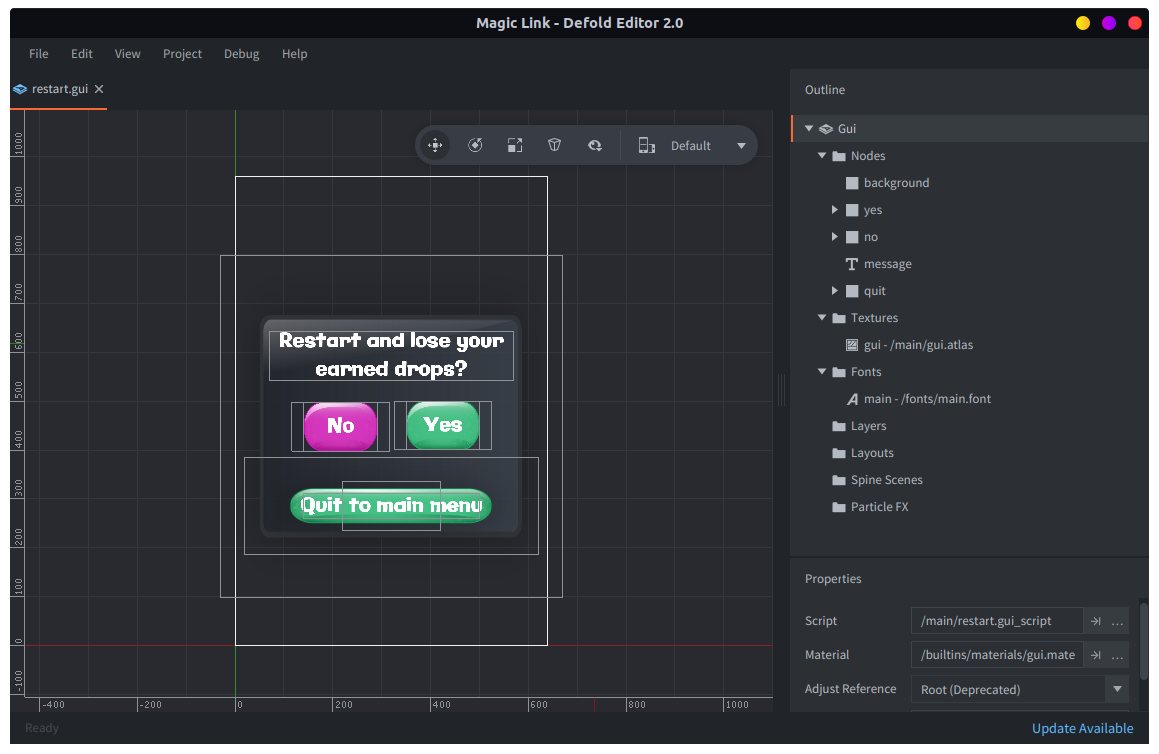
-- restart.gui_script
function on_message(self, message_id, message, sender)
    if message_id == hash("hide") then
        msg.post("#", "disable")
        msg.post(".", "release_input_focus")
    elseif message_id == hash("show") then
        msg.post("#", "enable")
        msg.post(".", "acquire_input_focus")
    end
end

function on_input(self, action_id, action)
    if action_id == hash("touch") and action.pressed then
        local yes = gui.get_node("yes")
        local no = gui.get_node("no")
        local quit = gui.get_node("quit")

        if gui.pick_node(no, action.x, action.y) then
            msg.post("#", "hide")
            msg.post("/board#gui", "show")
        elseif gui.pick_node(yes, action.x, action.y) then
            msg.post("board:/board#script", "restart_level")
            msg.post("/board#gui", "show")
            msg.post("#", "hide")
        elseif gui.pick_node(quit, action.x, action.y) then
            msg.post("main:/main#script", "to_main_menu")
            msg.post("#", "hide")
        end
    end
    -- 사라질 때까지 모든 입력을 소비합니다.
    return true
end
또한 level_complete.gui 에 레벨 완료용 간단한 GUI 다이얼로그를 만들고, 플레이어가 CONTINUE 를 클릭하면 board 스크립트에 next_level 메세지를 보내는 간단한 스크립트를 붙입니다.
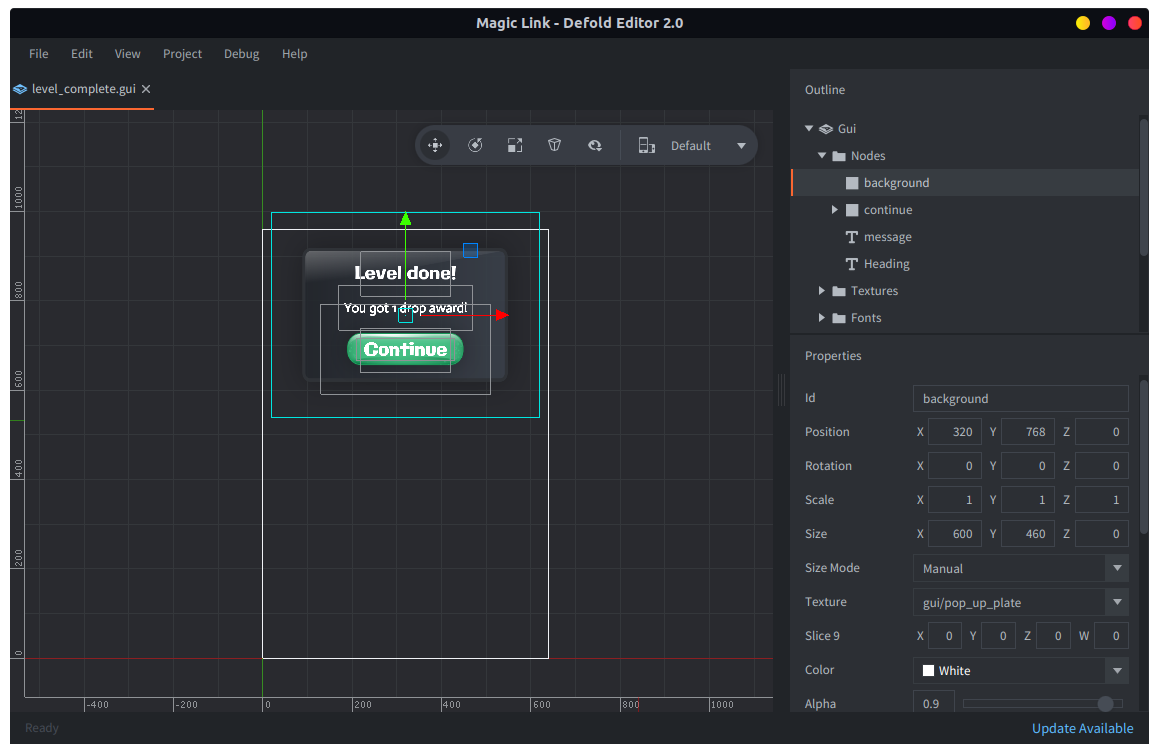
-- level_complete.gui_script
function init(self)
    msg.post("#", "hide")
end

function on_message(self, message_id, message, sender)
    if message_id == hash("hide") then
        msg.post("#", "disable")
        msg.post(".", "release_input_focus")
    elseif message_id == hash("show") then
        msg.post("#", "enable")
        msg.post(".", "acquire_input_focus")
    end
end

function on_input(self, action_id, action)
    if action_id == hash("touch") and action.pressed then
        local continue = gui.get_node("continue")

        if gui.pick_node(continue, action.x, action.y) then
            msg.post("board#script", "next_level")
            msg.post("#", "hide")
        end
    end
    -- 사라질 때까지 모든 입력을 소비합니다.
    return true
end
현재 레벨을 표시하는 다이얼로그도 추가합니다. 이 다이얼로그의 스크립트는 숨기기와 보이기만 포함합니다. 보일 때는 현재 난이도 레벨을 포함한 메세지로 다이얼로그 메세지를 설정합니다.
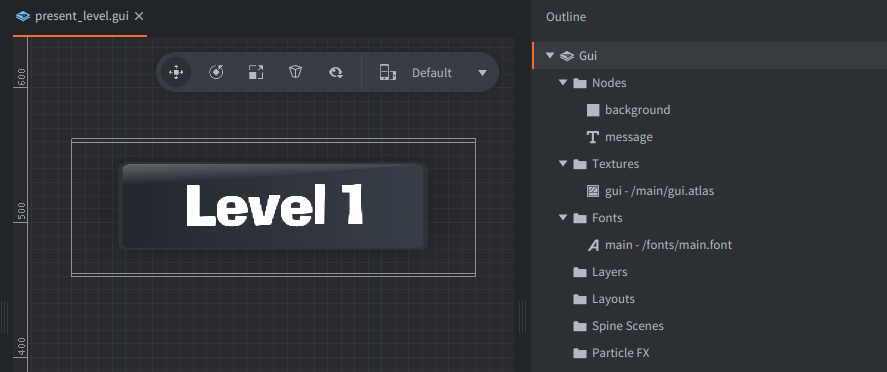
-- present_level.gui_script
function init(self)
    msg.post("#", "hide")
end

function on_message(self, message_id, message, sender)
    if message_id == hash("hide") then
        msg.post("#", "disable")
    elseif message_id == hash("show") then
        local n = gui.get_node("message")
        gui.set_text(n, "Level " .. message.level)
        msg.post("#", "enable")
    end
end
플레이어가 drop을 시도했지만 공간이 없을 때 표시되는 다이얼로그도 추가합니다.
-- no_drop_room.gui_script
function init(self)
    msg.post("#", "hide")
    self.t = 0
end

function update(self, dt)
    if self.t < 0 then
        msg.post("#", "hide")
    else
        self.t = self.t - dt
    end
end

function on_message(self, message_id, message, sender)
    if message_id == hash("hide") then
        msg.post("#", "disable")
    elseif message_id == hash("show") then
        self.t = 1
        msg.post("#", "enable")
    end
end
마지막으로 이 GUI 컴포넌트들을 board.collection 에 추가하고, 필요한 코드를 board.script 에 추가합니다.
on_message()에서 board로 오가는 모든 메세지를 처리하는 코드가 필요합니다.
start_level- 난이도 파라미터에 따라 매직 블록 수를 설정하고, 보드를 만든 다음 게임을 시작하기 전에 2초 동안 “present_level” GUI 다이얼로그를 보여 줍니다. 게임 시작은 다이얼로그를 제거하고 입력 포커스를 획득하는 것입니다. 여기서는 다른 용도로 쓰지 않는 “timer” 값을 애니메이션해서
go.animate()를 타이머처럼 사용한다는 점에 유의하세요. restart_level- 플레이어가 RESTART GUI 버튼을 누르고 확인했을 때 일어나는 동작입니다. 보드를 지우고 다시 만든 뒤 drop 카운터를 초기화합니다.
level_completed- 보드가 승리 상태가 되는 즉시 전송됩니다. 입력을 끄고 매직 블록을 애니메이션한 뒤 “level_complete” GUI 다이얼로그를 표시합니다. 플레이어가 다이얼로그의 CONTINUE 버튼을 클릭하면 다이얼로그가
next_level메세지를 다시 보냅니다. next_level- 이 메세지를 받으면 보드를 지우고, drop 카운터를 증가시키고, 다음 난이도 레벨을 설정한
start_level을 보냅니다. drop- drop을 수행할 수 있는 위치를 확인합니다. 가능한 위치가 없으면 “no_drop_room” GUI 다이얼로그를 표시합니다. 그렇지 않고 플레이어에게 남은 drop이 있으면 drop을 수행하고, drop 카운터를 감소시키고, 카운터의 시각적 표시를 업데이트합니다.
-- board.script
function on_message(self, message_id, message, sender)
    if message_id == hash("start_level") then
        self.num_magic = message.difficulty + 1
        build_board(self)

        msg.post("#gui", "set_drop_counter", { drops = self.drops } )

        msg.post("present_level#gui", "show", { level = message.difficulty } )
        -- 잠시 기다립니다...
        go.animate("#", "timer", go.PLAYBACK_ONCE_FORWARD, 1, go.EASING_LINEAR, 2, 0, function ()
            msg.post("present_level#gui", "hide")
            msg.post(".", "acquire_input_focus")
        end)
    elseif message_id == hash("restart_level") then
        clear_board(self)
        build_board(self)
        self.drops = 1
        msg.post("#gui", "set_drop_counter", { drops = self.drops } )
        msg.post(".", "acquire_input_focus")
    elseif message_id == hash("level_completed") then
        -- 입력을 끕니다.
        msg.post(".", "release_input_focus")

        -- 매직을 애니메이션합니다!
        for i, m in ipairs(magic_blocks(self)) do
            go.set_scale_xy(0.17, m.id)
            go.animate(m.id, "scale.xy", go.PLAYBACK_LOOP_PINGPONG, 0.19, go.EASING_INSINE, 0.5, 0)
        end

        -- 완료 화면을 표시합니다.
        msg.post("level_complete#gui", "show")
    elseif message_id == hash("next_level") then
        clear_board(self)
        self.drops = self.drops + 1
        -- 난이도 레벨은 매직 블록 수 - 1입니다.
        msg.post("#", "start_level", { difficulty = self.num_magic })
    elseif message_id == hash("drop") then
        s = dropspots(self)
        if #s == 0 then
            -- drop을 수행할 수 없습니다.
            msg.post("no_drop_room#gui", "show")
        elseif self.drops > 0 then
            -- drop을 수행합니다.
            drop(self, s)
            self.drops = self.drops - 1
            msg.post("#gui", "set_drop_counter", { drops = self.drops } )
        end
    end
end
이제 끝입니다! 게임도, 이 튜토리얼도 완성되었습니다. 이 게임을 즐겨 보세요!
다음 단계
이 작은 게임에는 흥미로운 특징이 몇 가지 있으며, 직접 실험해 보는 것을 권장합니다. Defold에 더 익숙해지기 위해 해 볼 수 있는 연습 목록은 다음과 같습니다.
- 상호작용을 명확히 하세요. 새 플레이어는 게임이 어떻게 동작하는지, 무엇과 상호작용할 수 있는지 이해하기 어려울 수 있습니다. 튜토리얼 요소를 넣지 않고도 게임을 더 명확하게 만드는 데 시간을 써 보세요.
- 사운드를 추가하세요. 현재 게임은 완전히 조용하며, 멋진 사운드트랙과 상호작용 사운드가 있으면 더 좋아질 것입니다.
- 게임 오버를 자동으로 감지하세요.
- 최고 점수. 지속되는 최고 점수 기능을 추가하세요.
- GUI API만 사용해서 게임을 다시 구현하세요.
- 현재 게임은 레벨이 올라갈 때마다 매직 블록을 하나씩 추가하는 방식으로 계속됩니다. 이 방식은 영원히 지속 가능하지 않습니다. 이 문제에 대한 만족스러운 해결책을 찾아보세요.
- 스프라이트를 삭제하고 다시 스폰하는 대신 재사용해서 게임을 최적화하고 최대 스프라이트 수를 낮추세요.
- 서로 다른 해상도와 종횡비의 화면에서도 게임이 똑같이 보기 좋게 나오도록 해상도 독립적인 렌더링을 구현하세요.